Push Piers, or Foundation Piers, are used on foundations that have been continuously sinking into the ground. Homes, businesses, any building can sink into the ground. Obviously, buildings should not be sinking into the ground. At construction, your home or building was built (if it was post 1900) with a concrete pad or footing underneath your walls. If you have ever read Devil in the White City, you will have learned about Footings and Foundation Pads.
A Strong Base
If we start thinking about it, it does not take an engineer to realize that the heavy weight of the home can sink into the ground. You know this if you’ve ever stepped foot in mud or sand. In order to combat this, builders have been installing bases to homes in the form of concrete pads. How it works:
- A hole is dug for the foundation. This hole is slightly larger than the foundation forms set in (this will become important later).
- A horizontal concrete footing (or pad in the case of monolithic pours) is installed at the bottom of the hole around where the perimeter walls will be.
- After the concrete gains strength, the walls and rest of the home are poured on top.
The idea here is that the concrete footing or pad spreads and distributes the weight of the structure along a wider area, preventing the building from sinking.
*Fun Fact* Buildings built for the World Exposition Fair in Chicago sunk over 8” into the ground overnight, as they were built quickly and with no concrete footings or pads. It was overcoming these challenges that helped engineers come up with the concrete footings and pads.
Stopping the Movement
First things first, we need to stop the building from settling. This is done by the installation of Push Piers. Push Piers are hollow metal tubes. These are typically 3 feet each in length and will be inter-linked as they are driven into the ground to make one, long pier.
Standard sizing for piers in the Residential Market is about 3” diameter. Some contractors will use less, which can be okay so long as the spacing of the piers is closer (more on this soon). Some contractors will use larger piers, which is unnecessary and simply a sales ploy to convince you that other products are inferior. Bigger is NOT always better.
A simple process exists for the installation of these piers. It can be broken down into 4 easy steps:
- Dig and expose the footing of the foundation.
- The bottom of the foundation must be exposed and clear in order to install Push Piers.
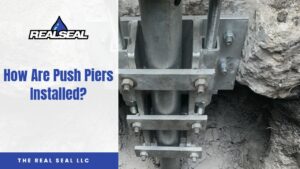
- Cut off the “Toe” of the Footer and Install Pier Bracket.
- The “Toe” of the Footer is the wider part of the concrete. The Push Pier must be driven underneath the wall in order to have the maximum strength.
- Pier Bracket is installed. It is through this that the Push Pier is installed.
- Dive Push Piers through Pier Bracket to supportive soil.
- Using a Hydraulic Pump, we are able to drive the Push Piers into the ground, using the weight of the home. Thus, we call them “Push Piers.”
- Backfill the dirt around the foundation.
For a GREAT visual representation of how this works, take a look at our in-house “How We Do It” Video on Push Piers:
Different Depths for Different Areas
If you haven’t asked the question yet, let me ask it for you. How deep do these Push Piers go? The answer is simple. As deep as they need to go. There are two major factors that affect the depth of push piers:
- Weight of the Structure.
- The heavier the building, the deeper the piers need to go to reach supportive soil (typically the deeper you go, the harder/compacted the soil gets)
- Condition/Makeup of the soil.
- Different types of soil have different strengths. In some cases, Bedrock exists in very near the surface. In others, it is over a hundred feet down.
We have pushed piers as shallow as 12 feet (This was in Chicago with a Limestone Shelf at 12 feet), and deeper than 100 feet.
**PRO-TIP** Many contractors, not us, will have “depth clauses” in their contracts. This will give you a false sense of the price, as piers can go much deeper than anticipated. We have seen jobs cost twice as much as they were originally quoted. If you want the best security for your job price, select a contractor that does not use depth clauses.
Thanks for reading, we hope you’ve learned a lot! And as always,
“Not Everything’s Better When Wet”